
三分钟带你入门人脸识别
人脸识别是AI研究带给世界的众多奇迹之一。对于许多技术人员来说,这是一个充满好奇的话题-他们希望对事物的工作方式有基本的了解。让我们潜入主题,看看事情如何运作。
人脸识别
解决此类问题时,最好不要重新发明轮子-我们不能!最好遵循研究人员提供给我们的模型。开源中也有很多可用的工具。这样的Python库之一是face_recognition。它可以通过几个步骤工作:
- 识别给定图像中的人脸
- 识别面部特征
- 生成128个值的人脸编码向量
基于这种编码,我们可以测量两个脸部图像之间的相似度-可以告诉我们它们是否属于同一个人。
首先安装face_recognition模块
- pip install face_recognition
导入模块 接下来,我们导入所需的模块
- import PIL.Image
- import PIL.ImageDraw
- import requests
- from io import BytesIO
- from IPython.display import display
- import face_recognition
载入图片 接下来,我们加载图片。我已将图像存储在我的Github帐户中。这样我们就可以从URL中读取原始图像。
- response = requests.get("https://raw.githubusercontent.com/solegaonkar/solegaonkar.github.io/master/img/rahul1.jpeg")
- fr_image = face_recognition.load_image_file(BytesIO(response.content))
识别面孔 加载面部后,让我们看一下face_recognition模块的各个部分。它如何识别人脸?
- face_locations = face_recognition.face_locations(fr_image)
- number_of_faces = len(face_locations)
- print("I found {} face(s) in this photograph.".format(number_of_faces))
这给了我们一个输出:
- I found 1 face(s) **in** this photograph.</span>
这意味着,该算法仅在图像中找到了一张脸。让我们看看所识别的图像和面部。
- pil_image = PIL.Image.fromarray(fr_image)
- for face_location in face_locations:
- # Print the location of each face in this image. Each face is a list of co-ordinates in (top, right, bottom, left) order.
- top, right, bottom, left = face_location
- print("A face is located at pixel location Top: {}, Left: {}, Bottom: {}, Right: {}".format(top, left, bottom, right))
- # Let's draw a box around the face
- draw = PIL.ImageDraw.Draw(pil_image)
- draw.rectangle([left, top, right, bottom], outline="black")
这给了我们一个输出
- A face **is** located at pixel location Top: 68, Left: 117, Bottom: 291, Right: 340</span>
上面的代码还修改了图像以在脸部周围绘制一个矩形。让我们检查一下是否运作良好。
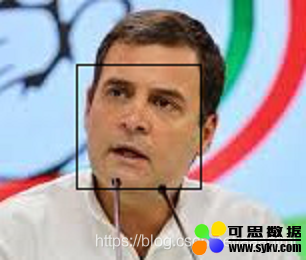
已经可以了。
人脸编码 这是我们的面孔。但是,对于我们的算法而言,它只是RGB值的数组—匹配从我们提供给它的数据样本中学到的模式。
对于面部识别,该算法记录了面部的某些重要测量值,例如眼睛的颜色和大小和倾斜度,眉毛之间的间隙等。所有这些共同定义了面部编码-从图像中获取的信息-即用于识别特定面孔。
为了了解从面部读取的内容,让我们看一下读取的编码。
- face_encodings = face_recognition.face_encodings(fr_image)
- face_encodings[0]
打印出一个巨大的数组:
- array([-0.10213576, 0.05088161, -0.03425048, -0.09622347, -0.12966095,
- 0.04867411, -0.00511892, -0.03418527, 0.2254715 , -0.07892745,
- 0.21497472, -0.0245543 , -0.2127848 , -0.08542262, -0.00298059,
- 0.13224372, -0.21870363, -0.09271716, -0.03727289, -0.1250658 ,
- 0.09436664, 0.03037129, -0.02634972, 0.02594662, -0.1627259 ,
- -0.29416466, -0.12254384, -0.15237436, 0.14907973, -0.09940194,
- 0.02000656, 0.04662619, -0.1266906 , -0.11484023, 0.04613583,
- 0.1228286 , -0.03202137, -0.0715076 , 0.18478717, -0.01387333,
- -0.11409076, 0.07516225, 0.08549548, 0.31538364, 0.1297821 ,
- 0.04055009, 0.0346106 , -0.04874525, 0.17533901, -0.22634712,
- 0.14879328, 0.09331974, 0.17943285, 0.02707857, 0.22914577,
- -0.20668915, 0.03964197, 0.17524502, -0.20210043, 0.07155308,
- 0.04467429, 0.02973968, 0.00257265, -0.00049853, 0.18866715,
- 0.08767469, -0.06483966, -0.13107982, 0.21610288, -0.04506358,
- -0.02243116, 0.05963502, -0.14988004, -0.11296406, -0.30011353,
- 0.07316103, 0.38660526, 0.07268623, -0.14636359, 0.08436179,
- 0.01005938, -0.00661338, 0.09306039, 0.03271955, -0.11528577,
- -0.0524189 , -0.11697718, 0.07356471, 0.10350288, -0.03610475,
- 0.00390615, 0.17884226, 0.04291092, -0.02914601, 0.06112404,
- 0.05315027, -0.14561613, -0.01887275, -0.13125736, -0.0362937 ,
- 0.16490118, -0.09027836, -0.00981111, 0.1363602 , -0.23134531,
- 0.0788044 , -0.00604869, -0.05569676, -0.07010217, -0.0408107 ,
- -0.10358225, 0.08519378, 0.16833456, -0.30366772, 0.17561394,
- 0.14421709, -0.05016343, 0.13464174, 0.0646335 , -0.0262765 ,
- 0.02722404, -0.06028951, -0.19448066, -0.07304715, 0.0204969 ,
- -0.03045784, -0.02818791, 0.06679841])
这些数字中的每一个代表面部编码的正交分量。
相似 现在让我们研究下一步-确定面孔之间的相似性。为此,我们需要加载更多图像。
让我们首先加载三个图像。加载图像时,我们还先找到人脸,再找到人脸编码。
- response = requests.get("https://raw.githubusercontent.com/solegaonkar/solegaonkar.github.io/master/img/rahul1.jpeg")
- image_of_person_1 = face_recognition.load_image_file(BytesIO(response.content))
- face_locations = face_recognition.face_locations(image_of_person_1)
- person_1_face_encoding = face_recognition.face_encodings(image_of_person_1, known_face_locations=face_locations)
- response = requests.get("https://raw.githubusercontent.com/solegaonkar/solegaonkar.github.io/master/img/rahul2.jpg")
- image_of_person_2 = face_recognition.load_image_file(BytesIO(response.content))
- face_locations = face_recognition.face_locations(image_of_person_2)
- person_2_face_encoding = face_recognition.face_encodings(image_of_person_2, known_face_locations=face_locations)
- response = requests.get("https://raw.githubusercontent.com/solegaonkar/solegaonkar.github.io/master/img/trump.jpg")
- image_of_person_3 = face_recognition.load_image_file(BytesIO(response.content))
- face_locations = face_recognition.face_locations(image_of_person_3)
- person_3_face_encoding = face_recognition.face_encodings(image_of_person_3, known_face_locations=face_locations)
现在,识别相似性并不困难。face_recognition模块提供了一个简单的API。
- face_recognition.compare_faces([person_1_face_encoding,person_3_face_encoding], person_2_face_encoding[0], tolerance=0.08)
该方法检查要比较的两个面的每个分量,并告诉我们当前分量是否在公差范围内变化。上面的命令显示如下输出:
- [array([ True, True, True, True, True, True, True, True, True,
- True, True, True, True, True, True, True, True, True,
- True, True, True, True, True, True, True, True, True,
- True, True, True, True, True, True, True, True, True,
- True, True, True, True, False, True, True, True, True,
- True, True, True, True, True, True, True, True, False,
- True, True, True, True, True, True, True, True, True,
- True, True, True, True, True, False, True, True, True,
- True, True, True, True, True, True, True, True, False,
- True, True, True, True, True, True, True, True, True,
- True, True, True, False, True, True, True, True, True,
- True, True, True, True, True, True, True, True, True,
- True, True, True, True, True, True, True, True, True,
- True, True, True, True, True, True, True, True, False,
- True, True]),
- array([ True, True, True, True, True, True, False, False, False,
- True, True, True, False, True, True, True, False, True,
- False, True, True, True, True, False, True, True, True,
- False, True, True, True, False, True, True, True, True,
- True, True, True, True, False, True, False, True, True,
- True, True, True, False, True, False, True, True, True,
- False, False, True, True, True, True, True, False, True,
- False, False, False, False, True, False, True, False, True,
- False, True, True, True, True, False, True, True, True,
- True, True, True, False, True, True, True, False, True,
- True, False, True, True, True, True, True, True, True,
- True, True, True, True, True, False, False, True, True,
- False, False, False, True, True, False, True, True, True,
- True, True, True, True, True, True, False, False, True,
- True, True])]
这两个数组表示给定图像(在第二个参数中)与提供的列表(在第一个参数中)中每个已知面部编码的相似性。
我们可以看到第一个数组显示出更多相似性。可以正确识别该人。
数码化妆 如果您喜欢有趣,我们可以使用面部识别库做更多的事情。我们有一个API,可以帮助我们识别面部的各个特征。
- face_landmarks_list = face_recognition.face_landmarks(fr_image)
- print(face_landmarks_list)
这为我们提供了每个单独特征曲线的长长列表。
- [{
- 'chin': [(46, 47), (45, 54), (44, 62), (44, 69), (44, 77), (46, 84), (49, 91), (54, 95), (61, 97), (68, 97), (76, 95), (84, 91), (90, 87), (94, 81), (97, 75), (99, 68), (101, 60)],
- 'left_eyebrow': [(51, 42), (54, 39), (58, 39), (63, 40), (67, 42)],
- 'right_eyebrow': [(75, 44), (80, 44), (86, 44), (90, 47), (93, 51)],
- 'nose_bridge': [(70, 48), (68, 52), (67, 56), (66, 60)],
- 'nose_tip': [(60, 64), (62, 65), (65, 67), (68, 66), (71, 66)],
- 'left_eye': [(55, 47), (57, 45), (61, 46), (63, 48), (60, 48), (57, 48)],
- 'right_eye': [(77, 51), (80, 50), (84, 51), (86, 54), (83, 54), (79, 53)],
- 'top_lip': [(54, 75), (58, 72), (61, 72), (64, 73), (66, 73), (70, 75), (73, 80), (71, 79), (66, 75), (63, 75), (61, 74), (56, 75)],
- 'bottom_lip': [(73, 80), (68, 81), (64, 81), (62, 80), (60, 80), (57, 78), (54, 75), (56, 75), (60, 77), (63, 78), (65, 78), (71, 79)]
- }]
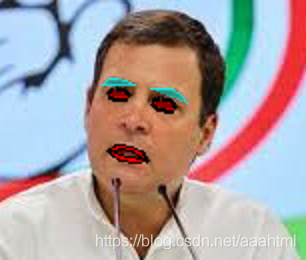
我们可以对此图像应用数字化妆。
- for face_landmarks in face_landmarks_list:
- pil_image = PIL.Image.fromarray(fr_image)
- d = PIL.ImageDraw.Draw(pil_image, 'RGBA')
- # Make the eyebrows into a nightmare
- d.line(face_landmarks['left_eyebrow'], fill=(0, 0, 0, 255), width=3)
- d.line(face_landmarks['right_eyebrow'], fill=(0, 0, 0, 255), width=3)
- d.polygon(face_landmarks['left_eyebrow'], fill=(0, 0, 0, 255))
- d.polygon(face_landmarks['right_eyebrow'], fill=(0, 0, 0, 255))
- # Gloss the lips
- d.line(face_landmarks['top_lip'], fill=(0, 0, 0, 255), width=10)
- d.line(face_landmarks['bottom_lip'], fill=(0, 0, 0, 255), width=10)
- d.polygon(face_landmarks['bottom_lip'], fill=(255, 0, 0, 255))
- d.polygon(face_landmarks['top_lip'], fill=(255, 0, 0, 255))
- d.line(face_landmarks['top_lip'], fill=(0, 0, 0, 255), width=2)
- d.line(face_landmarks['bottom_lip'], fill=(0, 0, 0, 255), width=2)
- # Chin
- d.polygon(face_landmarks['chin'], fill=(255, 0, 0, 16))
- # Apply some eyeliner
- d.line(face_landmarks['left_eye'] + [face_landmarks['left_eye'][0]], fill=(10, 0, 0, 255), width=6)
- d.line(face_landmarks['right_eye'] + [face_landmarks['right_eye'][0]], fill=(10, 0, 0, 255), width=6)
- # Sparkle the eyes
- d.polygon(face_landmarks['left_eye'], fill=(255, 0, 0, 200))
- d.polygon(face_landmarks['right_eye'], fill=(255, 0, 0, 200))
- display(pil_image)
下面是我们得到的。

时间:2021-02-18 22:39 来源:未知 转发量:次
声明:本站部分作品是由网友自主投稿和发布、编辑整理上传,对此类作品本站仅提供交流平台,转载的目的在于传递更多信息及用于网络分享,并不代表本站赞同其观点和对其真实性负责,不为其版权负责。如果您发现网站上有侵犯您的知识产权的作品,请与我们取得联系,我们会及时修改或删除。
相关文章:
相关推荐:
网友评论: